- Health Conditions A-Z
- Health & Wellness
- Nutrition
- Fitness
- Health News
- Ayurveda
- Videos
- Medicine A-Z
- Parenting
- Web Stories
Yoga Flow Poses That Help You Slow Down After A Hectic Day
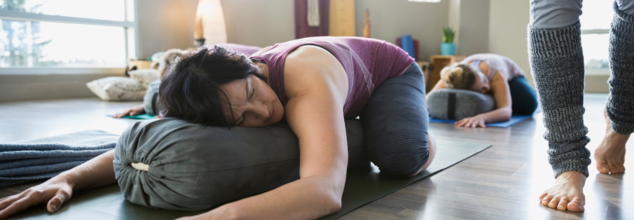
(Credit-Canva)
Work can get very hectic at times, and often people do not have time or the energy to go do intense exercises. The best option for such times is yoga. Not only is yoga more movement and energy efficient, but it also restores your energy instead of draining it. There is a style of yoga called restorative yoga. The Cleveland Clinic explains that this form not only benefits your mind, but it also helps you calm your thoughts and release the tension in your body.
Aspects of Restorative Yoga And Calming Poses
Some aspects of this yoga form include living more mindfully, improving your self-esteem, strengthening your core, improving your flexibility as well as stretching out your muscles. These poses give you a period of complete relaxation and mental restoration.
Cobra Pose
Inhale slowly and lift your chest and belly off the mat by pressing your tented fingertips into the floor. As you rise into your version of Cobra Pose, press through the tops of your feet, distributing weight towards the pinky toe side of each foot, allowing your inner thighs to gently move away from each other. Breathe into any comfortable degree of backbend.
Half Frog Pose
Keep your left leg extended straight behind you as you bend your right knee out to the side, flexing your right foot into Half Frog Pose. Maintain the flex in your right foot as you gradually lower your upper body towards the mat, with your forehead being the last to arrive.
Half Frog Cobra Pose
Inhale and lift your chest and stomach from the mat once more into Half Frog Cobra Pose. Keep your right knee bent and your right foot flexed. Feel free to keep your elbows bent as much as needed, lifting your chest only to a comfortable height for today.
Half Frog Sphinx Pose
Place your palms and forearms flat on the mat in front of you, with your elbows slightly ahead of your shoulders. Inhale and press into your forearms to lift your chest into Half Frog Sphinx Pose. Actively draw your elbows back towards your toes as you guide your heart forward.
Thread the Needle Pose
Exhale and transition into Supine Twist using Thread The Needle. Come onto your right hand as you slide your left arm underneath you, resting on your left shoulder and the side of your face.
Supine Twist
At the end of your exhalation, fully unwind into a Supine Twist by extending your right arm out to the left and allowing your right shoulder to lower towards the mat. Rest on your left hip while keeping your left knee bent. Gaze upwards or towards your right hand. Pause here for a breath, expanding your wingspan while ensuring both shoulders remain grounded.
Tented Fingers
Begin lying flat on your stomach with your forehead resting on the mat and your feet positioned as wide as or wider than your mat. Tent your fingers on the outer edges of your mat, slightly ahead of your shoulders.
Do Your Knees Click When You Walk? Here’s When You Should Worry

Credits: iStock
It happens during your morning jog, climbing stairs, or even standing up from a chair. A subtle click, pop, or grind echoes from your knee joint. For some, it’s background noise they’ve learned to ignore. For others, it’s a source of anxiety—“Is this arthritis? Am I damaging my knee every time I move?”
The phenomenon, known medically as knee crepitus, is surprisingly common. Studies show it affects 41 percent of the general population, and most of the time, it’s harmless. But in some cases, those noisy knees can signal something more serious. Let’s break down what science knows about knee crepitus, why it happens, and when it’s time to book an appointment with your doctor.
What Is Knee Crepitus?
Knee crepitus is the audible sounds—crackling, clicking, creaking, or grinding—when the knee joint is moving. These sounds can occur when bending the knee, squatting, going up and down stairs, or even walking. Scientists are still piecing together the definitive causes. The top theories are:
- Gas bubbles bursting in the synovial fluid that lubricates the knee.
- Tendons or ligaments snapping as they glide over bony surfaces.
- Cartilage alteration, particularly if the joint's smooth surface has commenced to deteriorate.
These sounds are frequently a normal consequence of movement and joint mechanics in most instances. The interesting aspect is that individuals with no history of knee injury or pain report the same noises.
A major review of over 100 studies, including more than 36,000 individuals, found knee crepitus in 36 percent of people who were not painful and had no recorded knee injury. Creaky knees, in short, are commonly normal.
Is Knee 'Clicking' Always Arthritis?
Among the most prevalent fears associated with noisy knees is osteoarthritis (OA), a degenerative joint condition that inflicts millions globally. Science confirms a correlation: up to 81 percent of those with osteoarthritis experience knee crepitus.
But the fact that crepitus is present doesn't necessarily equate to arthritis. One study of close to 3,500 older adults found that two-thirds of individuals who reported "always" having crepitus did not develop symptomatic arthritis in the next four years.
In younger adults, particularly in those recovering from knee injuries or surgery, crepitus can be more common. Other research indicates that such noises are attributed to early cartilage damage, especially around the kneecap area. Yet research also finds that noisy knees following injury do not necessarily mean poorer long-term prognosis.
Although crepitus is more prevalent in arthritis, it is not used as a diagnostic instrument in isolation. Pain, swelling, stiffness, or limited mobility are more powerful red flags that indicate medical evaluation.
When Should You Worry About Clicking Knees?
If your knees click but otherwise are okay, there typically isn't anything to worry about. There are some cases, though, where clicking knees need more scrutiny. Get medical advice if clicking or grinding is accompanied by:
- Ongoing or severe pain
- Swelling or redness near the joint
- A sense of instability or locking
- Notable stiffness or limited range of motion
- Other evidence of arthritis, including redness or ongoing pain
In such instances, a physician might suggest a physical examination, imaging tests, or referral to a specialist.
Treatment Options: What Works and What Doesn't?
Sorry, there's no silver bullet for knee crepitus itself. If the sound isn't painful and isn't interfering with your activities, no treatment is typically indicated. But if crepitus is associated with an overall problem of the knee, treatment is based on the underlying condition.
Home Remedies for 'Clicking' Knees
Exercise: Strenthening the quadriceps and surrounding muscles stabilizes the knee and decreases stress on the joint. The American Academy of Orthopaedic Surgeons (AAOS) advises partial squats and leg presses.
Weight control: Having a healthy body weight decreases pressure on the knees.
RICE method (Rest, Ice, Compression, Elevation): Useful if crepitus is associated with mild injury or inflammation.
Medical and Non-Invasive Treatments
Physical therapy: Customized regimens enhance strength, flexibility, and joint mechanics.
Topical NSAIDs: Gels such as diclofenac (Voltaren) may relieve pain associated with osteoarthritis.
Platelet-Rich Plasma (PRP) Therapy: Currently under investigation, PRP injections can possibly alleviate pain and enhance function in osteoarthritis individuals.
Surgical Options
Only when other options do not work is surgery an option:
Arthroscopy: Minimal invasive surgery to fix damaged cartilage or excise loose pieces.
Osteotomy: Shaping bones to take pressure off the knee joint.
Knee replacement: Only for severe arthritis, this restores joint function and pain relief.
Why You Shouldn't Stop Moving?
One of the most harmful misconceptions about creaky knees is that exercise will make them worse. Actually, not moving can have the opposite effect. Exercise is important to keep joints healthy, improve mobility, and slow the progression of arthritis.
To quote one orthopedic specialist, "Joints are meant to move. Avoiding activity out of fear can cause muscle weakness, creaky joints, and in fact, escalate pain in the long term."
Knee crepitus is a normal occurrence that may be startling, but usually, it doesn't cause harm. Clicking knees without pain are usually never something to worry about. The important thing is to listen to what your body's saying, if the sound is accompanied by pain, swelling, or restricted function, then it's time to have it investigated.
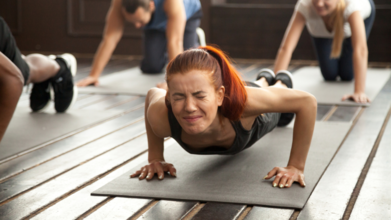
Still Sore From Your Last Workout? When To Push Through And When To Rest

Credits: iStock
If you’ve ever struggled to climb stairs the morning after leg day or winced while raising your arms after a tough upper-body session, you’ve experienced delayed onset muscle soreness (DOMS). This soreness usually shows up 12–24 hours after a workout, peaking within two to three days. It’s the result of microscopic tears—known as microtears—in the muscle fibers. As your body repairs those small damages, inflammation occurs and causes the aching or stiffness.
Interestingly, soreness most frequently happens when you resume training after being off for a while, experiment with a new motion, or raise the intensity of your workouts. Your muscles get used to it over time, and soreness lessens.
Does Muscle Soreness Mean You're Getting Stronger?
Soreness is mistakenly linked to progress by many individuals due to the widespread "no pain, no gain" slogan. But muscle soreness is an unreliable indicator of fitness gains. What it really indicates is that your body has been faced with something new or more challenging. For example, an everyday runner is not likely to be sore after their normal mileage, but their cardiovascular fitness remains on the rise. Similarly, a weightlifter can gradually develop strength in their muscles without feeling the same amount of soreness that they felt when they were starting out.
Soreness doesn't equate to success. Your consistency, progressive training, and recovery dictate results.
Should You Work Out When You’re Still Sore?
Exercising with low-level soreness is typically okay, but it can have some impact on performance. Studies indicate DOMS temporarily decreases strength, balance, and even coordination. That is, you may not lift as much, run as quickly, or play as accurately if you persevere. For those with goals related to performance—be it running a faster 5K or excelling in a sport—it's worth considering the potential impact of soreness on outcomes.
But mild soreness isn't an excuse to altogether avoid training. Gentle activity, like a walk, yoga, or light swim, can actually enhance blood flow, which facilitates nutrients getting to your muscles and supports recovery. Avoid pushing through acutely painful, severe swelling, or long-term soreness lasting over a week—those are signs of an injury.
Do Rest Days Really Matter for Fitness?
There is widespread thinking that you have to alternate workout days with rest days in order to notice improvement. But a study examining the comparisons between training on consecutive days versus non-consecutive days revealed little disparity in long-term strength or endurance gains. That is to say, the body can adapt no matter whether you train back-to-back or with rest days in between.
All that being said, rest days may still be of use. They enable your body to recharge energy levels, provide muscles with additional time to recover, and, crucially, maintain motivation in the long term. For most individuals, incorporating rest days or reduced training sessions avoids burnout as well as the risk of overuse injuries.
Recovery Tools for Better Relief
When soreness persists, a lot of individuals resort to recovery hacks. Some are more effective than others:
- Fluids are important. Water supports the transportation of nutrients and the removal of waste products associated with inflammation.
- Foam rolling or massaging tools (self-myofascial release) can enhance blood flow in affected areas and decrease stiffness, though effects are small.
- Diet is important. Consuming protein- and carbohydrate-balanced meals within 30–60 minutes post-exercise aids in muscle repair and energy restoration.
- Sleep is not negotiable. Quality sleep is when most of the body's repair work happens. Cutting corners with sleep slows the recovery and builds up fatigue.
- Active recovery—such as a light bike ride, restorative yoga, or stretching workouts—is able to decrease discomfort by keeping the blood flowing.
- Other approaches, such as ice baths or compression clothing, have mixed outcomes in studies. Although they might offer temporary relief, they're not necessary for recovery unless you find them individually beneficial.
When Can Muscle Soreness be Something More?
It's worth noting when soreness is to be expected and when it may be covering an injury. If you experience intense soreness that persists beyond seven days, jabbing pain in a specific area, bruising that can be seen, or swelling, you should see a doctor. These may be signs of muscle strain, tear, or another cause.
Also, pushing through pain can do more harm than good. Unlike DOMS, which improves with time and light movement, injury-related pain typically worsens with activity.
We hear all the time that inflammation is bad, but in exercise, some inflammation is necessary. It's what tells your body to repair and rebuild muscle tissue more robust than ever before. Chronic inflammation, which is associated with disease, is bad. But the temporary inflammation produced by training is what makes training work. The trick is to give your body sufficient recovery so this process can finish.
Do Warm-Ups or Stretching Prevent Soreness?
Interestingly, static stretching prior to exercising does not avoid soreness and can even decrease strength for the short term. Dynamic warm-ups, however—exercises that simulate your workout, like lunges, arm circles, or jogging in place—can prep your muscles and possibly minimize soreness thereafter. However, this alleviation is small. The true advantage of a warm-up is actually preventing injuries and improving performance, not avoiding soreness.
Post-exercise soreness is normal to physical stress, and usually, it's nothing to worry about. The solution is found in balance: stressing your body sufficiently to force it to change, but allowing it enough time and resources to heal. If soreness is slight, light exercise can actually accelerate healing. If soreness is extreme, then rest and proper attention are your best friends.
Ultimately, the mantra shouldn’t be “no pain, no gain” but rather “train smart, recover smarter.” By paying attention to the signals your body sends, you’ll not only reduce your risk of injury but also set yourself up for consistent, sustainable progress
Your Workout Is Reprogramming Your Gut, Here’s How Exercise Intensity Changes Everything
Credits: iStock
We've all understood that exercise improves cardiovascular function, boosts the brain, and even lifts mood but the connection between physical training and gut health is now proving to be one of the most exciting areas of medical science. New research from Edith Cowan University (ECU) in Perth, Australia, indicates that the intensity of your training—rather than the frequency—can actually reconfigure your gut microbiome in tangible ways.
PhD student Bronwen Charlesson, who headed the research, was curious to know how various training loads affect athletes' gut microbes and how these changes may reflect on health and performance. "Athletes possess a distinct gut microbiota compared with the general population," she said. "This encompasses higher total short-chain fatty acid levels, increased diversity, and a distinct balance of bacterial species.
Her research stands on the shoulders of a burgeoning body of science associating the gut microbiome with virtually every element of human health, ranging from immunity and inflammation to energy metabolism. Exercise intensity is now potentially joining diet and genes as a critical player in this intricate system.
Charlesson's work demonstrated that training intensity had a direct impact on gut health markers, such as short-chain fatty acids (SCFAs)—molecule-significant compounds found when gut bacteria ferment food fiber. SCFAs are associated with decreased inflammation, better metabolic markers, and more efficient energy use and thus of interest especially for athletes.
Surprisingly, changes in the populations of some bacterial species reflected variation in training load. When doing high-intensity exercise, the gut ecosystem seemed to favor bacteria that subsist on lactate. Lactate, famously known to accompany sore muscles, doesn't only build up in the body—it's also shipped off to the gut, where certain microbes use it for energy. This gut-lactate dynamics might partially account for why athletic microbiomes differ from those of sedentary humans.
Can Rest Days Backfire on Your Gut?
The research also pointed out a behavioral twist, when training intensity decreased, diet quality also took a hit. Athletes in lower-load or rest phases had a higher tendency to eat more fast food, processed snacks, and alcohol while reducing fresh produce.
"While overall carbohydrate and fiber consumption remained constant, the food quality overall decreased," Charlesson observed. "This was accompanied by alterations in the microbiome, including decreases in protective bacteria."
Rest periods also introduced yet another change—reduced gut transit times. Basically, food moved more slowly through the digestive system, something that can shift the microbial balance. The slowing of the gut could possibly permit some bacteria to dominate and compromise the resilience gained through increased training loads.
What Does It Mean for the Athlete and Individuals That Exercise Every Day?
The results hold compelling potential for maximizing performance by managing the microbiome. Although researchers are still putting together the puzzle of exactly how the gut affects strength, endurance, and recovery, there are some theories making the rounds.
One hypothesis is that the microbiome regulates lactate metabolism and pH homeostasis, both important in explosive sports. Another is that gut bacteria are involved in nutrient uptake and energy supply, and thus diet-microbiome-exercise interaction is a three-way puzzle athletes cannot leave unsolved.
But the effects reach farther than high-end athletes. For anyone who exercises—whether you're a CrossFit enthusiast or a weekend jogger—your gut might be adjusting to how you exercise. High-intensity exercise, paired with balanced eating, may help maintain a healthier, more diverse microbiome. On the other hand, skimping on eating during recovery time could eliminate some of the benefits.
The research comes at a time when gut health is a global hot button. Digestive disorder, autoimmune, and metabolic disease rates are on the rise, and numerous researchers are looking to the microbiome as a unifying strand. Discovering how habits such as exercise intensity affect gut bacteria might be the key to new prevention and treatment avenues.
Gut health is not all about steering clear of stomach issues," Charlesson said. "It might also have a role in mental wellbeing, the immune system, and even our reaction to training. That makes it an important area to concentrate on not just for athletes but for anyone who wants to see general well-being."
How To Make Your Gut A Training Partner?
What this study actually implies is that the gut is not a passive commuter—it's an active partner in the way the body interacts with physical stress. Just as athletes dial in training phases, sleep, and water intake, the gut might have a place in the performance playbook.
Future studies might consider whether the personalization of diets based on training intensity augments both microbial diversity and athletic performance. Might probiotic or prebiotic supplementation be periodized similarly to workout routines? Might gut transit times be a signifier of recovery requirements? These are only just beginning to be queried.
Though the research was conducted on athletes, its messages have far-reaching applications. All exercisers might want to pay closer attention to how their rest days influence not just their calorie load, but also their gut flora. It's a wake-up call that health isn't an isolated thing—exercise, nutrition, and recovery are highly interdependent.
High-intensity exercise seems to make the microbiome richer in a way that might augment resilience, energy metabolism, and recovery. Consequently, a healthier gut might enable athletes—and normal exercisers—to handle higher training loads with less fatigue.
This cycle can partially account for why some people appear to thrive on strenuous regimens and others battle with chronic burnout. If subsequent studies validate this bidirectional relationship, microbiome analysis would become as ubiquitous as VO2 max or lactate threshold testing in the training room.
- Follow Us :


© 2024 Bennett, Coleman & Company Limited