- Health Conditions A-Z
- Health & Wellness
- Nutrition
- Fitness
- Health News
- Ayurveda
- Videos
- Medicine A-Z
- Parenting
Master Burpees With These 6 Easy-To-Follow Steps
Everyone likes the idea of staying fit, and since summers are approaching too, who does not want a perfect summer's body. One of the exercises, best suited for the most high intensity workout. In fact, this workout is one of the High-intensity interval training or HIIT workout. It is burpees. But, not everyone enjoys doing it.
HIIT are workouts which involves short bursts of exercise at more than 70% of your aerobic capacity. The key here is to focus on high-intensity workouts that increase your heart rate.
Burpee is also a full-body workout, which is why, for some it is something they swear by, while for others, they dread doing even one. Before we delve into why one must do it and how can one do it efficiently, let's know how to master burpees.
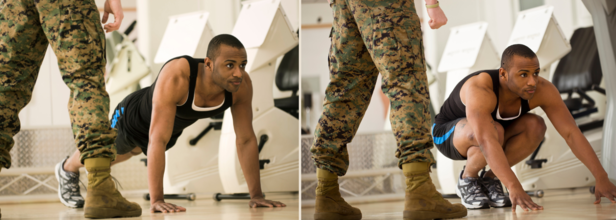
Step-by-step method of doing a burpee
- Start by standing on your feet, shoulder-width apart.
- Now, squat, place your hands flat on the floor, inside your feet.
- Now, go into a pushup position, squeeze your shoulder blades, abs, glutes. You can also wider the feet than shoulder-width apart.
- Bend your elbows, lower your chest, down to the floor. Stay here a while and then press back up into the pushup position.
- Leap your feet forward back to initial squatting position.
- Now, jump straight up into the air, powerfully. Then come back on the floor.
How To Do It Efficiently?
The focus here is to do it efficiently and not quickly. If you focus on the quickness, then chances are, you will tire yourself and not even get the most of it. You would also not get up as quickly as you want to. So, it is best to take your time, than to start doing everything quicker and then tire yourself.
When you are on the ground after the pushup position, ensure that your body is straight. You are not lying down. If your core in strong, it will be much easier for you to get up and complete your rep.
Keep your feet shoulder-width-apart, always. This will help you maintain your posture throughout, even when you are on the ground, holding a plank, keep your feet wide enough.
When it is the time to jump, don't just bunny hop, do it well. Make sure you end your burpee with the power move, and that power move is your jump.
ALSO READ: What Are Burpees And How Can They Help?
Who Made Burpees?
The exercise was named after its creator, physiologist Royal H Burpee, who used it as a protocol to test fitness and physical capacity in 1939. He created this exercise as part of his PhD thesis at Columbia University. Later, burpees were used by the US military as a benchmark test for incoming recruits.
However, back then, what he created was a simple burpee, it had four easy steps:
- Squat down and put both hands on the floor in front of you
- Pop your feet backward into a plank position
- Bring your feet back forward
- Stand back up
There was no pushup in the middle and no jump at the end. This was used to measure an athlete's standing heart rate, and then made to do four burpees and then test to see how long it took them to get their heart rate back to normal. When it was used in the military, it was settled on ten exercises to test which recruits would fit. The test was simple, how many burpees a soldier could do in 20 seconds.
What Are The Benefits?
Burpees are a major calorie burner as it is a full-body workout. It is also a multi-joint, multi-step exercise and enhances body control, coordination, explosiveness, and power, making them an all-around effective workout move.
Can Too Much Running Worsen PCOS? Gabby Logan Opens Up About Athlete Daughter’s Diagnosis

Credits: Instagram
British broadcaster Gabby Logan has revealed that her 20-year-old daughter Lois has been diagnosed with polycystic ovary syndrome (PCOS), a hormonal condition that may require her to step back from high-intensity endurance sport, including extreme long-distance running.
Speaking on her Mid-Point podcast, Logan said the diagnosis came after medical consultations about her daughter’s health and training. During the appointment, a specialist advised Lois to avoid “extreme running,” prompting mixed emotions in the family, concern about the condition, but also relief about scaling back punishing physical goals.
What PCOS Means for Athletes
PCOS is one of the most common endocrine disorders in women of reproductive age, affecting an estimated 8–13 per cent globally. It occurs when the body produces higher levels of androgens (male-type hormones) and often involves insulin resistance.
The condition can cause irregular periods, acne, excessive hair growth, weight changes and fertility challenges. Many patients also have difficulty regulating blood sugar, increasing long-term risks of type 2 diabetes and heart disease.
While exercise is widely recommended as a cornerstone of PCOS management, helping improve insulin sensitivity, metabolism and mood, specialists say the type and intensity of exercise matter.
Why Extreme Endurance Could Be A Problem
Doctors cautioned Lois against extreme endurance events such as half-marathons because prolonged, high-intensity training can significantly elevate cortisol, the body’s primary stress hormone.
In people with PCOS, hormonal balance is already fragile. Persistently high cortisol may:
- worsen insulin resistance
- disrupt ovulation further
- aggravate fatigue and inflammation
- intensify menstrual irregularities
In other words, although movement is beneficial, chronic physical stress can sometimes counteract the hormonal stability patients are trying to restore.
Moderate-intensity exercise, brisk walking, strength training and shorter runs, is generally considered more supportive for hormone regulation than sustained high-intensity endurance workloads.
From Half Marathon To Shorter Goals
Logan previously completed the London Landmarks Half-Marathon with Lois in 2024, describing the preparation as mentally and physically demanding. The pair had hoped to repeat the experience, but the new medical advice has changed those plans.
Instead, they now intend to focus on shorter runs together.
The television presenter admitted she felt a surprising sense of relief at the specialist’s recommendation, recalling how intense the training had been for both of them.
A sporting life continues — just differently
Lois, a competitive showjumper and university student, has long balanced academics with elite sport. She has ridden horses since childhood and competed at national levels, later even participating in a charity jockey race — an experience she described as “brutal.”
Her diagnosis does not end her athletic pursuits, but it reshapes them.
Medical experts increasingly stress that PCOS management is not about stopping exercise but tailoring it. Sustainable training, adequate recovery, and balanced nutrition often produce better long-term hormonal outcomes than relentless endurance performance.
For athletes with PCOS, the goal shifts from pushing physical limits to supporting physiological stability — a change that, doctors say, can ultimately protect both performance and health.
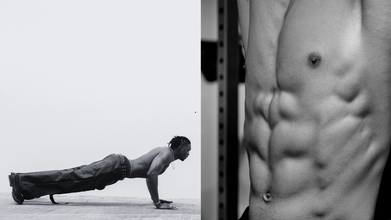
Are Abs And Core The Same Thing?
Credits: Canva
You must have heard people say, "Tighten those abs!' "Engage you core!" However, have you ever wondered what it really means? Are they the same thing? Is there a difference?
While "abs" and "core" tend to be used synonymously, the reality is that one is simply the exposed tip of the iceberg and the other, a dynamo driving your whole body's power and stability. Whether you're after a six-pack or just want to move with less pain and more power, knowing how your abs differ from your core might entirely overhaul how and why you train.
Although these terms are thrown about as if synonymous, they literally address different muscle groups with redundant but unique functions. And understanding the distinction might change how you train entirely not only for looks, but for functionality, posture, and strength in general.
Abs vs. Core: What's the Real Difference?
Most everyone has an idea of what abs are when they hear the term, it's all about that coveted "six-pack." But abdominal muscles are more than vanity points.
These are the rectus abdominis (for the six-pack appearance), the external obliques and internal obliques (for side bending and twisting), the transversus abdominis (lowermost layer stabilizing the spine), and the pyramidalis (a small muscle located close to the pubic bone).
Found in the front of your body, these muscles assist in the protection of internal organs, aid in posture, and create forward bending and twisting actions.
Visualize your core as the inner strength system of your body. It's not just the abs a larger, more comprehensive area that encompasses pelvic floor, diaphragm, back extensors, obliques, and even hip flexors. The core stabilizes your entire trunk, supports your spine, and facilitates coordinated movement. Whether lifting groceries or marathoning, your core provides balance and injury protection.
So while abs are part of your core, a solid core is so much more than toned midlines—it's your body's anchor.
Why Engaging Your Core Matters More?
If you’ve ever heard a trainer say “engage your core” and wondered what it really means, here’s the truth: core engagement isn’t just about tensing your stomach. It's about bracing your midsection in a way that stabilizes your spine without holding your breath or excessively sucking in.
Done right, activating your core during workouts:
- Reduces strain on the lower back
- Protects joints and ligaments from injury
- Improves posture and balance
- Improves control and efficiency in movement
Most individuals unconsciously overcompensate by hinging backward at the hips or holding their breath—errors that can diminish the efficiency of a workout as well as heighten the risk of injury.
Pro tip: You ought to be able to breathe naturally while keeping a solid, braced core.
5 Highly Effective Ab Exercises
When exercising specifically for the abs, these exercises isolate the front abdominal wall and obliques:
Bicycle Crunches
One of the best exercises to work both the obliques and rectus abdominis. Lie on back, legs up to tabletop, and rotate opposite elbow to knee in pedaling motion.
Leg Raises
Works lower abs. Lie on your back, hands under your hips, and lift legs up to 90 degrees slowly, then return without contact with floor.
Russian Twists
Ideal for the obliques. Sit, lean back somewhat, raise feet (optional), and twist torso side to side holding a weight or medicine ball.
Reverse Crunches
Begin on your back, knees bent. Contract abs in order to lift hips off the ground while curling knees toward your chest.
Flutter Kicks
Lie on your back, raise both legs off the floor a few inches, and alternate kicking up and down. Keep your core tight the entire time.
These exercises are best for developing definition and endurance in your abdominal muscles—but don't begin and end there.
5 Highly Effective Core Exercises
To get your entire core stronger, from back to hips to pelvic floor, these compound exercises are the key:
Plank Variations
From forearm to side planks, this isometric exercise uses every muscle in the core. Maintain hips level, spine neutral, and core braced.
Dead Bugs
Lie on back with arms and legs up. Lower opposite leg and arm slowly while keeping back flat. Works deep stabilizers.
Bird-Dog
On hands and knees, reach out opposite arm and leg. Great legs, lower back, and core stability exercise.
Glute Bridge with March
Lift hips up into a bridge, then alternate marching one foot at a time. Targets glutes, core, legs, and pelvic stabilizers.
Pallof Press
With a resistance cable or band, press hands straight out from chest resisting twisting. One strong anti-twist core exercise.
These training methods cause your body to function as a functional unit. Outcome? Less injury, improved posture, and enhanced performance in sports and everyday activity.
Should You Train Abs and Core Separately?
It all depends on your aim. If your main target is visual definition, ab-specific training along with proper nutrition and cardio is the priority. But for overall strength and spine development, incorporating core exercises into your regimen is not negotiable.
Your ideal weekly training schedule should have a balanced combination of both isolated ab exercises and compound core exercises. Isolated ab movements support the development of muscular endurance and play a role in visible muscle definition, especially in the rectus abdominis—the traditional "six-pack" muscle.
At the same time, compound core training addresses deeper stabilizing muscles that translate to overall strength, mobility, and spinal stability.
This integrated training not only enhances gym performance but also prepares your body to execute daily movement with more ease and efficiency. Knowing the distinction between abs and the core changes the way you train. It's not all about crunches—it's about developing a strong, functional center that stabilizes your whole body.
When you train for more than just looks and with core integrity, you minimize injury risk, enhance athletic performance, and feel stronger in day-to-day movements. So the next time you roll out on the mat, remember: engaging your abs is awesome, but strengthening your core? That's how you fuel your life.
Your Gym Weights Have More Bacteria Than A Toilet Seat

Credits: Canva
We walk into gyms thinking about gains. Stronger muscles, better stamina, maybe even that perfect mirror selfie. Everything looks clean, polished, and professional. But beneath that shiny surface lies an uncomfortable truth.
Studies reveal something alarming. Dumbbells can harbor 362 times more bacteria than a toilet seat, while fitness bikes may carry 39 times more bacteria than restaurant self-service trays. It sounds shocking, but the numbers tell a clear story. Your workout zone might also be a microbial playground.
Why Gyms Become Bacteria Hotspots
Gyms create the perfect environment for germs to thrive. Think about sweat, shared equipment, warm temperatures, humidity, and dozens of people rotating through the same machines every day.
Every time someone grips a dumbbell, lies on a mat, or adjusts a treadmill setting, they leave behind sweat, skin cells, and natural body oils. Multiply that by multiple users in just a few hours, and you have an invisible layer of bacteria building up.
Dr. Susheela Chaurasia, Consultant Microbiologist at Wockhardt Hospital, explains that gym equipment has several small crevices and surfaces that trap moisture and organic material. These warm and moist conditions create an ideal breeding ground for bacteria, viruses, and fungi.
Among the most common culprits found in gyms are Staphylococcus aureus, commonly known as staph, which causes skin infections, and Pseudomonas aeruginosa, which thrives in damp areas like locker rooms and can trigger respiratory or urinary tract infections.
Even with routine cleaning, high-touch surfaces remain vulnerable because equipment is constantly being reused.
When Workouts Come With Unwanted Side Effects
Have you ever returned home from the gym with an unexplained rash or irritation? It may not just be coincidence.
When you exercise, your pores open up and your immune system temporarily shifts focus. This can make it easier for bacteria to enter through tiny cuts, abrasions, or hair follicles. Wearing damp gym clothes for too long can also encourage fungal infections and skin irritation.
Frequent exposure to contaminated surfaces may increase the risk of recurring skin conditions, joint infections, or respiratory issues, especially in people with lower immunity.
It is not just gym members who are exposed. Trainers, staff, and cleaning crews operate in the same microbial environment daily. This increases the possibility of bacteria circulating within the space.
Read: Fact Check: Is Weight Lifting Safe for Teens?
Hygiene Is Your First Line of Defense
The good news is that you do not need to cancel your membership. You just need to be more mindful about hygiene.
Start with simple habits. Always wipe equipment before and after use. Use your own towel or mat to create a barrier between your skin and shared surfaces. Avoid touching your face during workouts. Wash your hands thoroughly once you are done. Change out of sweaty clothes immediately after exercising.
Experts stress that disinfection is more effective than basic sanitization when it comes to gym equipment. Non-porous surfaces like metal and plastic should be cleaned with recommended disinfectants because bacteria can survive in cracks or poorly cleaned areas.
Also, avoid walking barefoot in locker rooms, steam rooms, or pool areas, since these spaces are prone to fungal growth.
Do Not Bring the Gym Home
Your hygiene routine should not end when you leave the gym. Shoes worn outdoors and inside the facility can transfer germs onto your home floors. Keeping gym shoes separate or leaving them near the entrance can reduce this risk.
Shower soon after workouts, wash gym clothes regularly, and keep any cuts or wounds covered while exercising.
A Shared Space Means Shared Responsibility
Gyms are community spaces. Hygiene is not just personal but collective.
If you are feeling unwell, skipping a workout might actually be the healthier decision for everyone. Fitness is built through consistency, recovery, hydration, sleep, and balanced habits.
So the next time you pick up those weights, wipe them down first. Staying fit should never mean exposing yourself to unnecessary infections.
- Follow Us :


© 2024 Bennett, Coleman & Company Limited