- Health Conditions A-Z
- Health & Wellness
- Nutrition
- Fitness
- Health News
- Ayurveda
- Videos
- Medicine A-Z
- Parenting
Train Like Deadpool: Ryan Reynold Inspired 4- Day Workout Routine

Deadpool workout
Ryan Reynolds' fitness journey, especially in preparation for his iconic role as Deadpool, is a goal for many aspiring gym enthusiasts. From his early career transformation in Blade: Trinity to becoming the sarcastic, fast-talking anti-hero Wade Wilson in Deadpool, Reynolds has been known for maintaining a natural yet superhero-worthy physique.
Ryan’s long-term success in maintaining his shredded, lean muscle mass physique boils down to three core principles: motivation, consistent workouts, and a smart diet. His dedication to fitness is what keeps him movie-ready for his superhero roles. By embracing these principles, you can build the lean mass needed to fill out your own red onesie, just like Deadpool.
1. Motivation & Consistency
Reynolds has always been motivated, whether for financial compensation or the opportunity to portray his dream role. While Hollywood may not be knocking on your door, other motivations, like improving your health or achieving aesthetic goals, can keep you consistent. Just like Ryan, who has maintained his physique for over a decade, find your own reason to hit the gym and hold onto it.
2. Guidance from a Trainer
Ryan Reynolds worked with top trainers like Don Saladino to prepare for his superhero roles. Having a personal trainer can help modify workouts for your body type, teach proper techniques, and keep you motivated. You don’t need to be a movie star to benefit from expert fitness guidance. Whether you hire a trainer or follow a program designed for specific fitness goals, a structured plan is essential.
3. A Balanced Diet
One of Reynolds' key success factors is his approach to nutrition. Whether he's bulking up or leaning out, he does so with a balanced diet, ensuring he doesn't feel sluggish in the gym. A moderate calorie surplus or deficit, paired with whole foods such as lean meats, grains, nuts, and vegetables, keeps his energy levels optimal. Similarly, you can determine your calorie needs, then adjust based on your fitness goals to build lean muscle or shed fat.
The Deadpool-Inspired Workout Plan
Inspired by Ryan Reynolds’ training style, this 12-week workout program can help you develop lean muscle mass and improve your strength. While this isn’t Ryan’s exact routine, it is designed with principles that align with how he trains.
This program is a five-day split that targets all major muscle groups, with an emphasis on building glutes, legs, and lean mass. The inclusion of two leg days aims to naturally boost testosterone production, enhancing overall strength.
Workout Routine
5x5 Lifts: Rest for 3-5 minutes between sets and aim to lift 85-95% of your working max.
Other Exercises: Use 75-85% of your working max and take 60-second rest periods between sets.
Dynamic Warm-Up: Always start your workout with mobility and activation drills to prepare your muscles.
Rest Days: Incorporate low-intensity steady-state cardio, mobility flows, and ab workouts on off days.
Sleep for Recovery
Just as crucial as workouts and diet, Ryan emphasizes the importance of sleep. Quality sleep (7-9 hours) promotes muscle repair, hormone regulation, and growth. Make sure to prioritize rest to get the most out of your fitness routine.
Get started on this program and embrace the fitness lifestyle. With consistency and dedication, you’ll be Deadpool-ready in no time!
High BP? This Ancient Chinese Practice May Be As Good As Brisk Walking

Credit: iStock
High blood pressure (BP) has become a public health problem that is driving cardiovascular diseases like heart attacks and strokes globally. While medications are important to keep hypertension under control, lifestyle changes and healthy practices are also crucial.
Several global health guidelines recommend regular physical activity, but adhering to exercise programs daily becomes a challenge for many people. But in the overtly busy schedules, sparing 10 minutes for an exercise regimen can be easier than travelling to the gym.
A large randomized clinical trial, published in the Journal of the American College of Cardiology (JACC), has proved that a traditional Chinese mind-body practice — baduanjin — may help lower blood pressure, that too, without any equipment.
Baduanjin is a slow, structured movement, focused on deep breathing and meditation.
Importantly, the clinical trial proved that the ancient Chinese technique could lower BP as effectively as brisk walking.
In people practicing baduanjin, BP reductions were seen after three months and were sustained for one year.
"Given its simplicity, safety, and ease with which one can maintain long-term adherence, baduanjin can be implemented as an effective, accessible, and scalable lifestyle intervention for individuals trying to reduce their blood pressure," said Jing Li, Director, National Center for Cardiovascular Diseases in Beijing, China.
Baduanjin: The 10 Minute Routine
Baduanjin is a standardized eight-movement sequence that integrates aerobic, isometric, flexibility, and mind-body components.
It has been in practice for centuries and commonly performed in community settings across China. The routine typically takes 10–15 minutes and requires no equipment and only minimal initial instruction.
Because it is low- to moderate-intensity, it is considered safe and accessible for many adults.
Also read: Cardiovascular Diseases Lead As India’s Top Killer: US Cardiologist Points Out Risk Factors
The Clinical Trial
A team of Chinese researchers led the first large, multicenter randomized trial to look at the impact of baduanjin on blood pressure.
They followed 216 participants, aged 40 years or older, across seven communities to determine changes in 24-hour systolic BP from baseline to 12 and 52 weeks.
Compared to people indulging in self-directed exercise, practicing baduanjin five days a week reduced
- systolic blood pressure by approximately 3 mg Hg
- systolic blood pressure by 5 mg Hg.
Notably, the benefits were sustained even without ongoing monitoring, a key challenge for many lifestyle interventions that struggle to maintain long-term adherence outside structured programs.
"Baduanjin has been practiced in China for over 800 years, and this study demonstrates how ancient, accessible, low-cost
approaches can be validated through high-quality randomized research," said Harlan M. Krumholz, Editor-in-Chief of JACC and the Harold H. Hines, Jr Professor at the Yale School of Medicine.
"The blood pressure effect size is similar to that seen in landmark drug trials, but achieved without medication, cost, or side effects. This makes it highly scalable for community-based prevention, including in resource-limited settings," they added.
Also read: AHA Cholesterol Guidelines 2026: How Indians Can Improve Heart Health
How To Practice Baduanjin
- Stand upright with your feet shoulder-width apart and keep your movements slow and controlled.
- Coordinate each motion with steady, deep breathing, inhaling and exhaling smoothly as you move.
- Move through the traditional eight postures in sequence, focusing on posture, balance, and relaxation rather than speed or force.
- Practice for about 10 to 15 minutes a day in a quiet space, maintaining calm attention throughout.
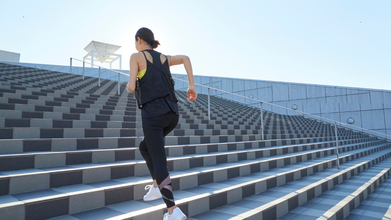
No Time for the Gym? Short Bursts of Intense Activity Daily May Cut Risk of 8 Diseases and Death
Credit: Canva
If you believe only gym workouts matter, you might be mistaken. While gyms offer a structured space to exercise, busy schedules often lead many to skip workouts—and feel guilty about it.
However, a new study suggests that even short bursts of vigorous everyday activity—such as running to catch a bus or climbing stairs quickly—can significantly reduce the risk of several major diseases and even lower the risk of death.
The research, based on nearly 96,000 people and published in the European Heart Journal, found that just a few minutes of intense activity each day was linked to a lower risk of:
- Major cardiovascular disease
- Irregular heartbeat
- Type 2 Diabetes
- Immune-mediated inflammatory diseases
- Liver disease
- Chronic respiratory diseases
- Chronic kidney disease
- Dementia
“We know that physical activity reduces the risk of chronic disease and premature death, and there is growing evidence that vigorous activity provides greater health benefits per minute than moderate activity,” said Minxue Shen from the Xiangya School of Public Health, Central South University, China.
Also read:Just Twice A Week At-home Resistance Training Enough To Build Muscle, Reveal New Guidelines
Longer Workouts or Intense Bursts?
To explore whether exercising more intensely offers greater benefits than simply exercising longer, the researchers followed 96,408 participants for seven years.
Each person wore a wrist-based accelerometer to track movement, including short bursts of activity often overlooked.
The findings showed that compared to those who did no vigorous activity, participants with the highest levels had:
- 63 percent lower risk of dementia
- 60 percent lower risk of type 2 diabetes
- 46 percent lower risk of death
“Our findings suggest that adding short bursts of activity that make you slightly breathless—like climbing stairs quickly or walking briskly between tasks—can have substantial health benefits,” Shen said.
“Even 15–20 minutes per week, just a few minutes a day, can make a meaningful difference,” the Professor added.
Also read: Exercising Could Make Your Brain Younger, Says Doctor
Is Vigorous Activity Safe for Everyone?
The World Health Organization (WHO) recommends that adults (18–64) perform at least 150–300 minutes of moderate-intensity aerobic physical activity, or 75–150 minutes of vigorous-intensity activity per week.
The new study suggests that intensity also plays a key role—and may vary depending on the disease being prevented.
The researchers noted that these findings could help shape more personalised exercise recommendations in the future. However, they cautioned that vigorous activity may not be suitable for everyone, particularly:
- Older adults
- People with certain underlying medical conditions.
IPL 2026: Rohit Sharma's Transformation Impresses Nita Ambani; Fitness Secrets Revealed

Rohit Sharma also smashed his fastest IPL 50 on Sunday against KKR.
IPL 2026 is back, and for fans of cricket, it is the most amazing and eagerly awaited time of the year. Eight exceptional teams, an incredible line-up of cricketing sensations from all over the world, and an unforgettable clash of titans — IPL deserves all the hype it gets. And after last night's incredible battle between Kolkata Knight Riders and Mumbai Indians, former captain Rohit Sharma also deserves all the hype he is getting. Not only did the Hitman score his fastest IPL 50, but he also managed to impress everyone with his transformation. Nita Ambani, Chairperson and founder of the Reliance Foundation and Dhirubhai Ambani International School, and a director of Reliance Industries (owner of the Mumbai Indians team too), was awestruck to see a fitter version of Sharma.
Read more: Checking BMI For Body Weight? It Can Wrongly Mark You As Overweight or Obese, Says Study
When Nita Ambani did not recognise Rohit Sharma
In a recent video shared on the Instagram page of Mumbai Indians, Nita Ambani is seen meeting the squad as they were training ahead of the 2026 IPL. As she encounters Sharma, she says, "My God, Rohit, I didn’t recognise you! You look like a young boy."
Rohit Sharma, now 38, will be turning 39 on April 30, but to a fan's eye, he seems to be ageing in reverse. On May 7, 2025, Sharma announced his retirement from Test cricket. Earlier in 2024, he announced his retirement from T20Is after the 2024 World Cup win. Since then, he has focused primarily on ODIs and, as it turns out, on becoming a fitter version of his current self.
Read more: Exercising Could Make Your Brain Younger, Says Doctor
A fitter Rohit Sharma since retirement
Rohit Sharma smashed an impressive 78 off 38 balls in last night's match against KKR, and perhaps his success can be credited to his recent transformation. His physical transformation took place ahead of the Vijay Hazare Trophy, and he lost an impressive 11 kilos before returning to the game. But what his fans loved most is that he was never really lagging because of the extra weight — he was always fit, quick and proactive, but now he is a lot leaner on the outside. How did the former skipper achieve this goal? Let’s find out:
- Hydration: For Sharma, fitness has to start with hydration, and this involves drinking plenty of water throughout the day in various forms — protein shakes, green tea and carrot juice.
- High-protein meals: According to TheHealthSite, Sharma switched to a high-protein diet, which is one of the most important steps in a weight-loss journey. This means foods like eggs, oats, legumes, millet rotis, brown rice, grilled chicken and salads dominated his diet routine.
- Workout regime: A workout regimen need not be about the kind of exercise one does, but also the timings. Reports suggest that Sharma kick-started his days with 30 minutes of cycling, followed by a core workout. And the best part — he relied on morning workouts for optimal results, as during the early hours of the day, scientists say it is the best time to break a sweat.
Cardio workouts like interval training, running and cycling help build stamina and endurance — these help ensure peak performance during stressful matches.
- Follow Us :


© 2024 Bennett, Coleman & Company Limited