- Health Conditions A-Z
- Health & Wellness
- Nutrition
- Fitness
- Health News
- Ayurveda
- Videos
- Medicine A-Z
- Parenting
- Web Stories
Do Vibration Plates Really Help You Get Fit? All About The Fitness Trend
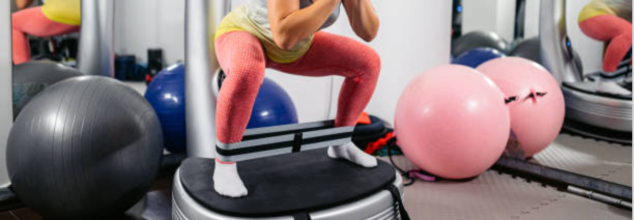
Image Credit: Pexels
If you've been scrolling through Instagram or TikTok, you've probably seen videos of people standing, squatting, or even doing push-ups on a vibrating platform. These viral videos showcase the latest fitness trend- vibration plates. Though they might look like another passing social media fad, vibration exercise has been around for decades. Originally hailed as a miracle weight-loss device via vibrating belt machines in the mid-20th century, the technology has come a long way to today's high-tech vibration plates.
Supporters say that vibration plates can improve muscle tone, boost circulation, increase bone density, and even aid in weight loss. But do these assertions stand up to scientific examination? And are vibration plates safe for all? Let's get to the facts.
A vibration plate is an exercise device that creates quick motion, causing your muscles to contract and release several times every second. They function through the stimulation of involuntary muscle contractions, simulating the results of traditional exercise but at a more frequent rate. Some devices oscillate in more than one direction—back and forth, side to side, and front to back—producing harmonic motion that stimulates muscle activity as much as 50 times every second.
It is as easy as standing on it and as complicated as adding dynamic exercises such as squats, lunges, or push-ups. The idea is to maximally stimulate the muscles and total fitness with minimal stress.
Do Vibration Plates Actually Work?
Vibration plate research has been mixed. While some studies endorse their effectiveness for enhancing muscle strength, flexibility, and blood flow, others advise against using them for extreme weight loss or gains in muscle mass.
A 2019 journal review in the Journal of Musculoskeletal and Neuronal Interactions examined seven trials in 280 subjects. The review concluded that vibration plates helped reduce fat, although the evidence was not consistent on a significant loss of total body fat percentage.
Also, a 2021 study investigated the impact of whole-body vibration training on older adults. Researchers found that vibration plates may be used as an alternative to increase muscle strength, especially for individuals who cannot do conventional strength-training exercises. Likewise, a 2007 study discovered that vibration exercise may be used to fight age-related muscle loss in men aged 60 and above.
Benefits of Vibration Plates
Despite the sparse research, there are some potential advantages of incorporating vibration plates into a larger fitness regimen:
Increased Muscle Tone and Strength – The involuntary contractions of muscles caused by vibration plates can possibly increase muscle activation, resulting in strength gains over time.
Increased Circulation – The vibrations activate blood flow, which can promote recovery and lower muscle soreness.
Increased Bone Density – Vibration therapy can increase bone mineral density in some studies, which could lead to a decreased risk of osteoporosis.
Increased Balance and Flexibility – The instability of the vibration plate causes the body to activate stabilizing muscles, enhancing balance and coordination.
Lymphatic Drainage – Whole-body vibration may assist with lymphatic drainage, which can assist with detoxification and immune function.
Weight Loss (When Used in Conjunction with Diet and Exercise) – Vibration plates by themselves will not lead to dramatic fat loss, but they can be a valuable addition to a comprehensive fitness program.
Are Vibration Plates Safe?
Although vibration plates have potential health benefits, they are not suitable for everyone. People with certain medical conditions should not use them because of possible risks.
Individuals with circulatory diseases such as deep vein thrombosis (DVT) or blood clot disorders should avoid using vibration plates. Studies have indicated that whole-body vibration may cause blood clots to be pushed out of place, which might result in fatal complications like a pulmonary embolism. Other individuals with pacemakers, advanced osteoporosis, or recent surgery should also seek the advice of their physician before utilizing vibration plates. Pregnant women should also avoid using these devices because of the effects of the vibrations on the body.
Moreover, research has associated long-term exposure to whole-body vibration—like that suffered by heavy machine operators—with risks of lower back pain and sciatica. Fitness professionals counter, though, that controlled, temporary use of vibration plates is unlikely to lead to these problems.
How to Use a Vibration Plate Safely
If you’re new to vibration training, start slowly and listen to your body. Experts recommend beginning with two to three short sessions per week and gradually increasing duration and frequency. A general guideline includes:
Beginners: 2-3 sessions per week, starting with 5-10 minutes per session.
Intermediate: 3-4 sessions per week, lasting 15-20 minutes.
Advanced: No more than 30 minutes per session to avoid excessive joint stress and muscle fatigue.
Exercises You Can Do on a Vibration Plate
To get the most out of vibration training, professionals suggest adding movement instead of just standing on the platform. Some of the best exercises are:
- Squats: Increases lower body strength and balance.
- Push-Ups: Works upper body muscles and core.
- Lunges: Works leg muscles while enhancing stability.
- Planks: Builds core strength and increases endurance.
- Calf Raises: Increases lower leg strength and circulation.
Although passive standing has its advantages, dynamic exercises will serve you best with your vibration plate training.
Vibration plates are not a weight loss or fitness miracle cure, but they can be a valuable addition when combined with a full exercise program. The secret is to apply them as an add-on to conventional workouts, not a substitute.
Ultimately, the key to long-term fitness gains is a combination of strength training, cardiovascular exercise, and a healthy diet. Vibration plates can be a low-impact, convenient means of supplementing your workout, but use them wisely and in moderation.
Cardiologist Warns “You Don’t Have One Heart... But 2”: How This ‘Silent’ Second Heart Could Change Your Health
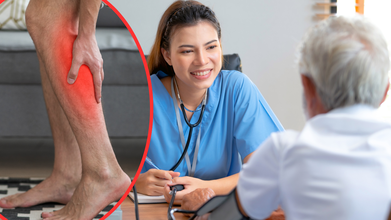
(Credit-Canva)
Our hearts works very hard to make sure we have the energy and strength to do everything we need. However, as gracious our organs are to us, most of us are not as helpful back to it. Whether it is eating junk food, not exercising, sleeping late etc. However, did you know, your heart is not the only one bearing the burden? You also have another heart in your body contributing to your health.
Heart transplant cardiologist Dr. Dmitry Yaranov calls your calf muscles your "second heart" for a very good reason. When you move your legs, these muscles squeeze and relax, which helps push blood back up toward your main heart.
This pumping action is essential for good circulation throughout your body. Without it, blood can pool in your lower legs, making it harder for your heart to work. By keeping your calf muscles strong, you help your body's entire circulatory system run smoothly, which can prevent problems like dangerous blood clots.
How Your ‘Sitting’ Lifestyle Is Killing Your Heart
Our modern lives often involve a lot of sitting, which is a big problem for our calves and our hearts. When we don't use our calf muscles, they weaken and lose their ability to pump blood effectively.
Dr. Yaranov warns that this forces your main heart to work much harder to circulate blood on its own. Over time, this extra strain can cause circulation to slow down, leading to swelling in your legs, high blood pressure, and a much higher risk of heart failure. No pill can replace the natural, powerful benefits of simply moving your body.
Simple Ways to Keep Your Calves Strong
The good news is that you can easily strengthen your calf muscles without a gym. Dr. Yaranov suggests simple changes to your daily routine. Try to walk every day to get your blood flowing.
You can also do calf raises while you're sitting at your desk or waiting in line at the grocery store. Whenever possible, choose to take the stairs instead of the elevator. These small, consistent actions will help keep your "second heart" strong and healthy for life, which in turn protects your main heart.
Calf Exercises You Can Do At Home
Calf Raises
Stand with your feet flat on the ground. Slowly lift your heels as high as you can, balancing on your toes, then lower yourself back down with control. Repeat for several repetitions to build strength.
Single Leg Calf Raise
Stand on one leg, using a chair or wall for balance. Lift your heel as high as possible, then lower it back down slowly. This variation helps improve your balance and builds strength one leg at a time.
Standing Calf Stretch
Stand a few feet from a wall and place your hands on it. Step one foot back and lean forward, keeping your back heel on the floor to feel a deep stretch in your calf. Hold for 30 seconds.
Dumbbell Calf Raise
Hold a dumbbell in each hand. Stand with your feet flat on the ground. Lift your heels and rise up onto your toes. Squeeze your calf muscles at the top before slowly lowering yourself back down.
Seated Calf Raise
Sit on a chair and place your feet flat on the floor. Place a heavy book or a dumbbell on your knees for weight. Lift your heels as high as you can, then slowly lower them for a controlled movement.
GLP-1 Alone Isn’t The Solution – Why Strength Training Is Key To Healthy Weight Loss Even With Weight Loss Injections
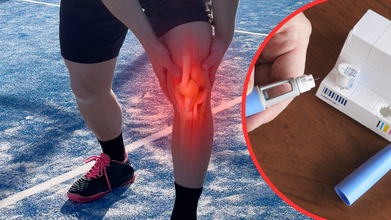
(Credit-Canva)
Weight loss injections have grown a lot in popularity as people flock to their healthcare professionals and nearby health stops to get one for themselves. Although it is rising in popularity, there are many side effects of the same. Many people find that different aspects of themselves have been altered after they took the weight loss injections along with some major bodily changes like loss of muscle mass.
Although these medications Ozempic, Wegovy, and Mounjaro—known as GLP-1 agonists—have become popular for their weight loss component, it was originally made for people with diabetes. Even though it is popular, the basic fundamentals of weight loss remain the same. A weight loss method that is devoid of exercise not only causes fat loss, but also muscle loss.
What Actually Happens When You Use GLP-1 Injection?
To understand how your body losses weight on weight loss injection, one must understand how this drug affects your body. GLP-1 agonists have three main effects on the body:
- They help the pancreas release insulin, which lowers blood sugar.
- They slow down digestion, meaning food stays in your stomach longer and releases sugar into your bloodstream more slowly.
- They affect the brain to make you feel fuller sooner and for longer.
You’re Losing Muscle, Not Fat
When you lose weight, you typically lose both fat and muscle. While some studies suggest that GLP-1s don't cause more muscle loss than other weight-loss methods, it's still a concern. A study published in the 2024 Diabetes, Obesity & Metabolism, suggested that muscle loss could be a big part of the total weight lost as much as 60% in some cases, while other studies show a much smaller amount.
Losing muscle can make you weaker, increase your risk of falls, and even reduce your bone density. This is why adding strength training to your routine is so important. It helps you build and keep muscle, which is key to a healthy and strong body.
Weight Loss Injections And Strength Training: Things To Keep In Mind
Talk to Your Doctor
Before starting any new exercise plan, always get advice from your doctor. They can give you a plan that is right for your health and the medicine you're taking.
Start Slowly
Begin with simple, gentle activities like walking. As you get stronger, you can gradually do more. Finding activities you enjoy, like dancing or cycling, will help you stick with it.
Mix It Up
A good routine includes a mix of different exercises. Try for at least 150 minutes of aerobic activity (like swimming) and two days of strength training (using weights or your own body weight) each week. Add in flexibility exercises like yoga to help with movement and prevent injury.
Monitor Your Blood Sugar
If you have diabetes, check your blood sugar before and after you work out. Your doctor can help you understand if you need to adjust your food or medication.
Stay Hydrated and Nourished
Make sure you're drinking enough water and eating healthy foods. This will fuel your body and help your muscles recover.
Listen to Your Body
Pay attention to how you feel during exercise. If you feel dizzy, unusually tired, or uncomfortable, it's a sign to slow down or stop. Your body will tell you what it needs.
No Longer Need 10,000 Steps? 2,500-4,000 Are Enough To Protect Your Heart, Says Doctor
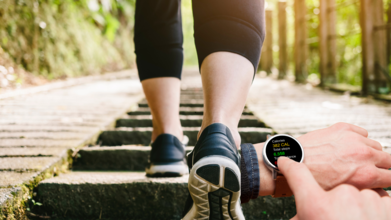
Credits: Canva
For years, 10,000 steps a day has been seen as the gold standard for fitness. However, new medical perspectives suggest that walking fewer steps, if done correctly, can still provide significant health benefits. Hyderabad-based neurologist from Apollo Hospital, Dr. Sudhir Kumar, in a detailed post on X, explained why people should not feel discouraged if they fall short of the 10,000-step benchmark.
Rethinking the 10,000-Step Target
The 10,000-step goal originated decades ago as a marketing concept rather than a scientifically backed number. While it remains a popular target, experts now stress that the quality of walking matters as much as quantity. Walking at a brisk pace and steadily increasing one’s step count over time can greatly benefit cardiovascular health, especially for individuals with high blood pressure.
Dr. Kumar noted that the UK Biobank study, a large-scale health database, revealed how every additional 1,000 steps per day lowers the risk of heart-related conditions. Missing the 10,000 mark, therefore, does not negate the benefits of walking.
Evidence From the UK Biobank Study
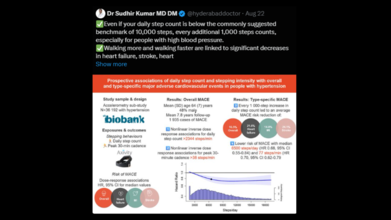
According to the data, each 1,000-step increase in daily activity contributed to:
- A 17% reduction in major cardiovascular events
- A 22% lower risk of heart failure
- A 9% decrease in heart attacks
- A 24% reduction in strokes
These findings underscore that even modest increases in walking can create measurable differences in long-term health outcomes.
Brisk Walking Packs an Extra Punch
One of the most striking observations was that brisk walking during the most energetic 30 minutes of the day offered unique benefits, regardless of the total daily step count. Short bursts of faster-paced walking appeared to provide added protection against heart disease. This suggests that people who cannot reach higher step counts may still safeguard their health by incorporating short, brisk walks into their routines.
Lower Threshold, Higher Impact
Dr. Kumar emphasized that as few as 2,500 to 4,000 steps per day can significantly lower illness risk when compared with a sedentary lifestyle. This is especially encouraging for individuals who may struggle to achieve higher numbers due to age, chronic illness, or busy schedules.
He also pointed out that 1.3 billion adults worldwide live with hypertension, making walking an especially important and accessible form of preventive healthcare. Even small increases in activity, such as adding 1,000 steps daily, can meaningfully reduce complications associated with high blood pressure.
How to Start Building Healthy Habits
For those looking to improve their step counts, experts recommend a gradual approach. Increasing daily activity by 500 to 1,000 steps at a time helps individuals avoid burnout and makes it easier to sustain the habit long-term. Maintaining a brisk pace is equally important, as intensity plays a key role in cardiovascular benefits.
A Simple and Accessible Strategy
Walking requires no special equipment, gym memberships, or training, making it one of the most accessible strategies for improving heart health. Dr. Kumar concluded in his X post that people should focus less on obsessing over 10,000 steps and more on moving consistently, briskly, and progressively.
Ultimately, whether someone walks 3,000 or 9,000 steps, the key message is clear: every step counts toward better heart health.
- Follow Us :


© 2024 Bennett, Coleman & Company Limited