- Health Conditions A-Z
- Health & Wellness
- Nutrition
- Fitness
- Health News
- Ayurveda
- Videos
- Medicine A-Z
- Parenting
- Web Stories
Yoga For Eyes: 5 Simple Exercises To Improve Eyesight
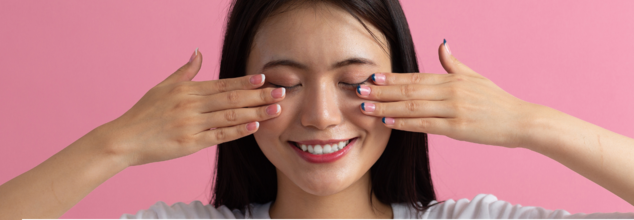
Yoga For Eyes: 5 Simple Exercises To Improve Eyesight
In the current decade, it is safe to say that this is the screens dominate generation with most if not all our daily activities need the use of a gadget. Considering this eye health has become a major concern. Children, once actively engaged in outdoor activities, now spend most of their time on gadgets like phones, tablets, and computers.
Similarly, adults also spend long hours working or browsing on screens, leading to digital eye strain. This constant strain contributes to various vision problems, such as nearsightedness and farsightedness.
To alleviate these issues, yoga offers a natural and effective way to improve eye health and reduce strain.
Here are five simple yoga exercises to enhance your eyesight and ease digital eye strain.
1. Palming
Palming is a simple yet effective exercise that relaxes your eyes and relieves stress. Here’s how you can do it:
- Sit comfortably, close your eyes, and take a few deep breaths to relax.
- Rub your palms together until they feel warm, then gently place your palms over your closed eyelids.
- Let the warmth from your palms be absorbed by your eyes, relaxing the muscles around them.
- Stay in this position for a few moments, then slowly lower your hands.
- Repeat this process at least three times to allow the heat to soothe your eyes and relieve tension.
2. Blinking
Blinking helps refresh your eyes and prevent dryness caused by staring at screens for long periods. Here’s how to do it:
- Sit comfortably and open your eyes.
- Blink rapidly 10 times in a row.
- Close your eyes and relax for 20 seconds, focusing on your breath.
- Repeat this cycle about five times.
This exercise will help hydrate the eyes and alleviate the strain caused by prolonged screen time.
3. Eye Rotations
Eye rotations help in improving the flexibility of the eye muscles and enhance blood circulation to the eyes. Follow these steps:
- Sit straight with your spine aligned and your hands resting on your lap.
- Gently rotate your eyes in a clockwise direction for 5-10 minutes, then rotate them in the opposite direction for another 5-10 minutes.
- Make sure to keep your head still during the exercise, focusing only on rotating your eyes.
This simple exercise promotes relaxation and reduces eye fatigue.
4. Up and Down Movement
This movement exercise helps strengthen the eye muscles and increases focus. Here's how to do it:
- Stand straight on the floor or a yoga mat.
- Look up at the ceiling, then shift your gaze to the floor and look up again.
- Repeat this movement 10 times without blinking.
- After completing the exercise, close your eyes and gently press your palms over them to relax.
This exercise can improve your eye focus and reduce the strain caused by constantly looking at near objects like phones and laptops.
5. Bhramari Pranayama (Bee Breath)
Bhramari pranayama is a calming breathing technique that can help relieve stress and enhance focus. It also improves eye function by increasing blood circulation to the area. Here’s how to practice it:
- Sit in a cross-legged position and close your eyes.
- Lightly press your thumbs on your ears and your index fingers on the center of your eyebrows. Rest your other fingers at the base of your nostrils.
- Take a deep breath in, hold for a few seconds, and then exhale slowly through your nose while making a humming sound. Keep your mouth closed while exhaling.
- Repeat this process five times.
Yoga For Beginners - How Modifications Can Help You Ease Into Yoga

Yoga has many poses, sometimes called asanas, with 84 main ones and millions of variations. Whether you're new to yoga or have practiced for years, the most important thing isn't to do every pose perfectly. Instead, it's about moving your body in ways that feel good and don't cause injury. As a beginner you must learn how to make yoga poses easier for you, this can actually make your practice much stronger overall.
What "Modifying" a Yoga Pose Means
Yoga is an ancient practice, and the pictures you often see show the most advanced versions of poses. Some of these can be very hard and take years to achieve. When you modify a yoga pose, you're simply adjusting it to fit your own skill level.
Sometimes, when people hear "modification," they might feel like they can't do a pose. But if you understand why you're doing a pose, you can choose an option that feels comfortable for your body.
How to Know When to Modify a Pose
The Cleveland Clinic explains that the first sign you need to change a yoga pose is pain. If you get into a pose and it feels a little uncomfortable or tight because you're stretching, that's okay. However, if something hurts, you need to stop. Don't try to push through pain. If it hurts, you should adjust the pose right away.
Yoga Stretching Tips for Beginners
Let's go back to those uncomfortable feelings. When you're stretching, remember that it takes time for your muscles to relax and lengthen. Your breathing is a huge part of this process.
If you push too far too quickly, your muscles will tighten up, which is the opposite of what you want. It takes about eight seconds for your muscles to even understand what you're trying to do. When stretching, start very gently and slowly go deeper. Also, focus on your breath. When you breathe out, that's the part where your body releases and relaxes. So, focus on exhaling as you try to stretch a little bit further. Here are some poses and how can you modify them.
Downward-Facing Dog
This pose stretches your whole body, forming an upside-down "V." Push into your hands and feet, lifting hips high. For comfort, bend your knees if hamstrings are tight, or place blocks under your hands for wrist support. You can also widen your feet for more stability and a gentler stretch.
Warrior II
Warrior II is a strong standing pose building leg and core strength while opening hips. Stand with one foot forward, knee bent over ankle, other foot turned out, arms stretched sideways. To modify, shorten your stance, avoid bending your front knee too deeply, or place hands on hips to ease shoulder strain, maintaining balance.
Seated Forward Fold
This relaxing pose stretches your hamstrings, spine, and shoulders. Sit with legs extended, then gently fold from hips, reaching towards feet or shins. If hamstrings are tight, bend your knees a lot. Use a strap around your feet or sit on a folded blanket to help you hinge comfortably.
Tree Pose
Tree pose requires balance. Stand on one leg, placing the other foot on your inner thigh or shin (avoiding the knee). For support, use a chair nearby to hold onto until you feel steady. You can also start by keeping your toes on the floor, with your heel just above your ankle, before lifting your foot higher.
Pigeon Pose
Pigeon pose can be intense for tight hips. One leg bends in front, the other stretches behind. To modify, place a blanket under your hips for support. You can also adjust your leg position into a "zigzag" shape by bringing the back knee forward, which still provides a good hip stretch comfortably.
Using Blocks for Balancing Poses (like Triangle or Half Moon)
For poses that involve bending sideways toward the floor, such as Triangle Pose and Half Moon, yoga blocks are very useful. Place a block under your hand instead of trying to reach the floor. This provides essential support, helps maintain proper body alignment, and ensures you get the correct stretch without straining.
RFK Wears Jeans On A Hike And To Gym, Why Is It A Bad Idea?
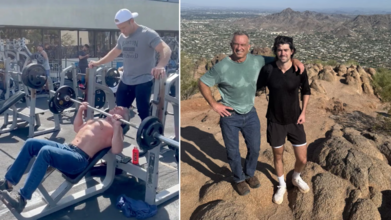
Credits: X
Robert F. Kennedy Jr., the U.S. Health Secretary and a well-known fitness enthusiast, has become the center of a new controversy. This time, it is not over policy, but his workout attire.
Kennedy was recently spotted hiking up Arizona’s Camelback Mountain in a pair of dark blue jeans on a scorching 107°F day, as reported by The Guardian. Photos of him drenched in sweat while climbing in a T-shirt and jeans quickly went viral, prompting both admiration for his stamina and concern for his sartorial and safety choices.
Kennedy, known for his unconventional stances on various health issues, has developed a pattern of working out in jeans.
Whether it’s hiking, lifting weights, or even wading into creeks, he seems committed to denim regardless of the activity or weather conditions.
While some fans praised his grit, others questioned the health implications of exercising in such restrictive clothing, especially given that the Centers for Disease Control and Prevention (CDC), which falls under his department, advises people to wear "loose, lightweight, light-colored clothing" during extreme heat to avoid heatstroke and other complications.
Why Denim Isn’t Built for the Gym
While Kennedy’s denim devotion has captured public attention, fitness experts and health professionals advise caution when it comes to choosing workout attire.
Here’s why jeans aren’t the best choice for physical activity:
Restricted Range of Motion
Jeans are typically made from thick, non-stretchy fabric, which can severely limit mobility during exercise. Movements required in activities like squats, lunges, and even basic stretching become difficult, which not only reduces workout effectiveness but may also increase the risk of injury.
Personal trainer Justin Kraft, speaking to Newsweek, pointed out that restricting motion can be harmful, especially for those with pre-existing conditions like high blood pressure or sciatica.
Low Breathability and Overheating
Unlike moisture-wicking fabrics found in gym wear, denim traps heat and sweat. In hot weather or high-intensity workouts, this lack of breathability can lead to overheating, discomfort, and even heat exhaustion. The Guardian noted that Kennedy hiked during record-breaking Arizona heat, despite warnings from the CDC about dressing appropriately in extreme temperatures.
Chafing and Skin Irritation
Chafing is a common side effect of exercising in jeans. The seams and heavy fabric can rub harshly against the skin, particularly in areas like the inner thighs, leading to painful rashes or abrasions.
Not Designed for Functionality
While jeans might offer some resistance, experts say there are better alternatives for those looking to add intensity to workouts. Weighted vests, resistance bands, slam balls, and other functional gear provide added challenge without compromising comfort or safety..
Easy Restorative Yoga Pose Inspired By Dogs – You May Be Doing It Wrong!
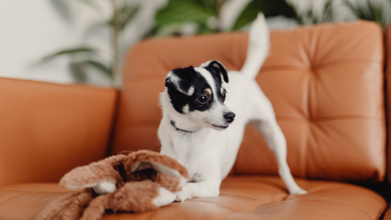
(Credit-Canva)
If you are someone who does yoga or have even read about yoga and its poses, practices, etc., you may have noticed an interesting fact about the exercise. Many of the poses in yoga often have animal names in them, like cobra pose, bird pose, cat-cow pose etc. That is because, as a practice of health and healing, yoga pulls from our own surroundings. Nature has inspired many poses in yoga such as tree pose, mountain pose and many more.
One such pose is inspired by dogs. Downward Dog is one of the most famous yoga poses, but it's easy to do it wrong! Things like rounding your back, putting your feet too far apart, or pushing too much weight into your wrists can actually cause more of a stretch than you need, and even lead to injuries.
What Is Downward Dog?
Downward Dog (also called Downward-Facing Dog, or Adho Mukha Svanasana in fancy yoga language) is a basic yoga pose. You'll often see it used to connect other movements, like in a Sun Salutation sequence. It's also a way to rest actively, stretch your body, and make yourself stronger all at once. It gives you a moment to check in with how you're feeling during your yoga practice.
In this pose, your body looks like an upside-down "V" shape, or like a pyramid. Imagine a straight line going from the top of your head, through your back, and right up to the ceiling from your bottom.
How to Do Downward Dog the Right Way
Downward Dog usually isn't the first thing you do in a yoga session. It's best to warm up your muscles and joints a bit first. Once you're warmed up, follow these steps. according to the Cleveland Clinic:
- Put your hands right under your shoulders (about shoulder-width apart) and your knees directly under your hips.
- Spread your fingers wide and press firmly into your whole hand. Tuck your toes under, as if you're trying to grip the floor.
- As you breathe out, push your hips up and back, like someone's pulling your bottom towards the ceiling. This makes your body look like an upside-down "V."
- Focus on keeping your back flat and straight, not rounded. Let your head and neck hang loosely between your upper arms. Think about pushing the floor away from you with your arms to keep them strong.
- Pull your belly button in towards your spine to use your core muscles.
- Keep your legs straight. If it feels okay, try to gently drop your heels towards the floor, but don't force it down.
- Shift your weight a little between your hands and feet until you feel steady and comfortable in the pose.
- Stay in this pose for 10 to 15 seconds, and remember to keep breathing deeply.
- If the stretch feels too much, simply bend your knees a little and adjust your position until it feels better.
- When you're done, breathe out and either move into your next yoga pose or gently lower yourself down to the floor into Child's Pose.
Benefits of Downward Dog (and Who Should Be Careful)
Downward-Facing Dog gives you a full-body stretch and also strengthens many parts of your body, including your:
- Shoulders
- Arms (triceps and biceps)
- Stomach muscles (abs/core)
- Backs of your thighs (hamstrings)
- Bottom (glutes)
- Fronts of your thighs (quads)
- Hip muscles (hip flexors)
- Knee joints
This pose really improves how flexible you are and how well you can control your movements. It also acts as a moment of active rest. Because your head is lower than your heart, it increases blood flow to your head and upper body.
- Follow Us :


© 2024 Bennett, Coleman & Company Limited