- Health Conditions A-Z
- Health & Wellness
- Nutrition
- Fitness
- Health News
- Ayurveda
- Videos
- Medicine A-Z
- Parenting
Yoga For Lung: Asanas To Improve Your Breathing

Yoga For Lung: Asanas To Improve Your Breathing
Delhi's pollution levels have seen an alarming rise that has resulted in severe health issues. It includes respiratory problems, eye irritation, and feeling fatigue. The blanket of smog over the cities gives an urgent call to fight for air quality degradation. From increased asthma cases to frequent sinus infections, respiratory problems are no longer rare.
For me, running through the day amidst pollution felt like a marathon, especially due to sinus and the season change. However, it was then that I realized one of the positives of doing yoga for lung benefits- how it helped improve the quality of my breathing and instilled a sense of calm.
This was an early discovery of what would become known as yoga - an art that has its benefit on breathing. Central to yoga are deep-breathing techniques and asanas which teach diaphragmatic breathing or expanding the lungs for increasing lung capacity. It enhances the efficiency of the respiratory system by helping one breathe more effectively while having a feeling of greater relaxation.
How Yoga Improves Respiratory Health
Some of the yoga poses are well known to target the chest and back muscles, the core and improve posture, giving maximum space for lung expansion for better lung functions, also helping to fight breathing complications caused by bad postures that may narrow down spaces in the lungs. Sometimes, even a number of yoga poses will facilitate the relief of the obstruction of the sinuses that normally causes congestion, enhancing better airflow through the nostrils, thus easing easy as well as effective breathing.
Yoga for Lungs
Beyond breathing, yoga benefits the lungs. When combined with chest-opening poses that improve posture, the practice becomes a good way to increase lung capacity and overall respiratory well-being. Here are some yoga poses to help boost lung capacity and support your breathing:
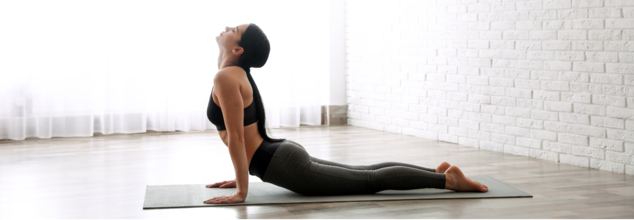
1. Bhujangasana (Cobra Pose)
Lie flat on your stomach with your face down.
- Bring your torso up from the bottom gently, palms beside you.
- Your palms and lower body should touch the ground.
- Maintain this for 30 seconds and then relax
- Do it thrice or four times a day.
Benefits: This asana stretches the chest and lung space; therefore, more oxygen is absorbed into the body and, consequently, lung capacity increases.
2. Ustrasana (Camel Pose)
- Sit on your calves with knees down, and make sure that your thighs do not touch your calves.
- Gradually lean back and put your hands on your ankles.
- Tilt your head back with your face looking upwards.
- Hold for 10-20 seconds and repeat for 3-5 minutes.
Benefits: Ustrasana stretches the whole front side of the body, expanding the chest cavity and making the breath go deeper.
3. Setu Bandhasana (Bridge Pose)
- Lie on your back, bend knees, and have your feet on the floor, hip-width apart.
- Put your hands by your sides, with palms facing the floor.
- Inhale; arching the spine up, push feet into the ground and lift hips up.
- Hold for 4-8 breaths and release back on the floor
Benefits: chest expansion increases lung capacity and oxygen assimilation
4. Pranayama
- Pranayama is any breathing practice, which in itself includes deep breathing techniques, diaphragmatic respiration, and alternate nasal respiration.
- Pranayama increases lung exercise by increasing lung capacity by improving oxygenation and helping in respiratory efficiency.
Benefits: Practicing daily pranayama results in the control of a person's stress and thus helps in maintaining good regulation of breath for overall pulmonary health.
5. Shavasana (Corpse Pose)
- Lie flat with your arms at your sides. Your palms should face upward.
- Spread legs slightly apart, wider than shoulder width.
- Focus on your breathing by letting each inhale be slow and natural and as slow and natural for every exhale.
Benefits: Shavasana relaxes the body, relieving respiratory pressure and promoting deep, cleansing breaths.
Increasing levels of pollution require extra attention to our lungs more than ever. Gentle but strong techniques of yoga could form a natural approach towards increased lung capacity and even in improving the function of breathing. It makes people breathe easier, relax better, and protect their lungs against the stress of pollution at modern times.
Take a deep breath, roll out your mat and let yoga guide you to healthier, stronger lungs.
7 Standing Exercises To Build A Stronger Core, Better Balance And Control

(Credit-Canva)
When it comes to building a strong core, most of us think about exercises like crunches, or sit ups. But there is a lot more to core strength than that. One of the main aspects of core strength is stability and balance. While the floor exercises are helpful, they strain your neck muscles, so what can one do?
You can build a powerful, stable midsection entirely on your feet. Standing core workouts are often more "functional" than traditional crunches because they mimic how your body actually moves in daily life, twisting, carrying, and resisting gravity.
7 Standing Exercises For Strong Core
These are some exercises you can try. They will not only help you build strong core muscles but also build your coordination and balance.
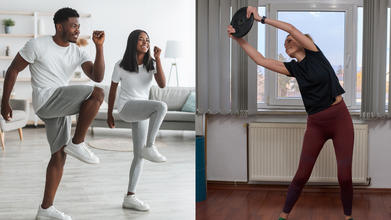
Standing Bicycle Crunches
This move is a fantastic way to wake up your entire abdominal wall. By bringing your opposite knee and elbow together in front of your body, you force your obliques to rotate and your front abs to crunch while standing. It also challenges your brain and balance as you switch from leg to leg. Focus on bringing the knee high rather than just pulling your neck down.
High-Intensity High Knees
This move brings a cardio element to your core training. By quickly driving your knees toward your chest, you engage the lower abdominals and hip flexors. It requires a lot of energy and keeps your heart rate high while forcing your abs to stabilize your upright torso. If the jumping is too much, you can perform it as a slow, powerful march instead.
Standing Dumbbell Side Crunch
Think of this as a side-bend with a purpose. By holding a weight in one hand and leaning toward it, you stretch the opposite side of your waist. The real work happens when you use those side muscles to pull your body back to a perfectly straight, upright position. It is one of the best ways to build lateral strength and define the sides of your torso.
Cable or Band Wood Chop
The wood chop mimics the diagonal motion of swinging an axe, which is a powerful, functional movement. It trains your core to handle rotational force, which is essential for sports like golf or tennis. As you pull the weight across your body, keep your hips stable and let your midsection drive the motion. This builds a core that is both strong and incredibly mobile.
Offset Marching
Holding a weight in one hand while marching forces your body to stabilize against an uneven load. Every time you lift a knee, your core has to fire to prevent you from wobbling or tipping toward the weighted side. This exercise is excellent for improving balance and strengthening the deep "hidden" muscles of the belly that keep your hips and lower back healthy.
The Pallof Press
This is an "anti-rotation" exercise, meaning the goal is to resist movement rather than create it. As you press a cable or band away from your chest, the tension tries to pull you sideways. Your core must stay tight to keep your hands centered. It is a subtle but intense burner that builds incredible stability in the deep abdominal layers and the obliques.
Heavy Suitcase Carry
This exercise is as simple as it is effective. By carrying a heavy weight on just one side, your core must work constantly to keep you from leaning over. This "anti-leaning" action recruits the deep muscles that protect your spine and improve your posture. Imagine there is a string pulling the top of your head toward the ceiling as you take steady, controlled steps.
This Is Exactly How Much You Need To Exercise To Control Your Blood Sugar

(Credit-Canva)
Your heart health does not depend on how much or intensely you exercised when as a young adult. Instead, a new study shows adults need five hours of exercise weekly to keep their heart healthy. This new research suggests that staying active through middle age is the key to preventing high blood pressure (hypertension) later in life
A long-term study published in American Journal of Preventive Medicine. of over 5,000 people found that while many people start out active in their 20s, those habits often slip away as they get older.
How Many Hours Do You Need To Exercise?
The study, led by experts at the University of California, San Francisco (UCSF), tracked participants for 30 years. They found that the current minimum exercise recommendations for adults might not be enough to regulate high blood pressure.
Currently, the standard advice is about 2.5 hours of moderate exercise per week. However, scientists found that people who worked out for five hours a week, double the minimum right now, and significantly lowered their risk. The benefit was strongest for those who kept up this routine until they reached age 60.
Why Does The Older Generation Need To Exercise More?
Between the ages of 18 and 40, most people’s activity levels drop significantly. As young adults move into college, start careers, or become parents, leisure time disappears, and exercise often falls to the bottom of the priority list.
Researchers noted that nearly half of the young adults in the study weren't active enough, which directly linked to seeing their blood pressure rise as they entered middle age.
High blood pressure is often called a "silent killer" because most people don’t feel any symptoms, yet it affects billions of people worldwide. If left unchecked, it can lead to:
- Heart attacks and strokes.
- An increased risk of dementia.
- General heart disease.
The World Health Organization reports that more than 25 percent of men and 20 percent of women deal with this condition.
Researchers pointed out that things like neighborhood safety, work responsibilities, and socioeconomic challenges can make it harder for some groups to maintain a consistent workout routine over several decades.
Easy and Cost Effective Ways To Control Hypertension
Controlling high blood pressure doesn't have to be expensive. By making simple lifestyle adjustments, you can significantly improve your heart health. Mayo Clinic suggests,
Move More and Sit Less
You should aim for 30 minutes of daily aerobic activity like walking, cycling, or dancing. Adding strength training twice a week helps even more. Regular movement can lower your blood pressure by 5 to 8 mm Hg. Replacing habits like driving to a nearby place with walking and taking the stairs instead of the elevator can also help.
Eat Smart and Reduce Salt
Diets like the Mediterranean diets, which has fruits, vegetables, and whole grains helps a lot. By lowering salt intake to 1,500 mg daily and eating potassium-rich foods can drop blood pressure by up to 11 mm Hg. Mayo clinic suggest that one must avoid processed foods and use herbs instead of table salt.
Ditch Harmful Habits
Limiting alcohol and quitting smoking are two of the fastest ways to improve your numbers. Smoking spikes blood pressure immediately, while excessive drinking makes heart medications less effective.
Prioritize Rest and Stress Relief
Aim for 7–9 hours of quality sleep, stress management is equally important, so practice saying "no" to extra tasks, focus on things you can control, and take time for hobbies.
Monitor and Support
Track your blood pressure at home and keep regular doctor appointments. Don't go it alone; involve friends or join a support group to stay motivated.
Fitness Trainer Reveals 8 'Weird' Habits That Can Help You Lose Weight

Credit: Instagram/Tarn Kaur
Tired of following multiple weight-loss diets and not seeing any results?
While many may recommend combining a strict, high-intensity workout routine with healthy food, Instagram-famous fitness trainer Tarn Kaur, who managed to lose nearly 40kg in less than a year, has revealed the 'weird' habits that helped her get back in shape instead.
Here is what the former lawyer, now online coach, recommends:
1. Keeping Treats Out Of Sight
Kaur noted in a lengthy Instagram post: "If I don’t see it, i don’t eat it. Hiding tempting foods has saved me from so many unnecessary snacks. out of sight, really, does mean out of mind."
2. Chewing Gum Like A Lifeline
The fitness expert revealed that she likes to eat a piece of mint after meals or whenever junk food cravings hit. "It’s like a little pause button for my brain and stops me from reaching for junk," she noted.
3. Planning Indulgences Ahead
In order to avoid binge eating or consuming excessive calories, Kaur logs her treats in an app even before she consumes them. She clarified that she likes to track her treats so as not restrict herself from eating but to 'take control and enjoy food without guilt'.
4. Checking If It's Worth It
Kaur explained: "If a food won’t give me pure satisfaction, I skip it. Life’s too short to feel bloated for something mediocre. My body deserves better." The trainer believes life is too short to feel bloated over something mediocre and feels her body deserves better.
5. Saying “I'm Full” Out Loud
Kaur mentioned that saying “I'm full” out loud helps signal her brain that she's done eating and prevents mindless bites when she's not paying attention.
6. Skipping Bread And Extras
Citing the phrase 'out of sight, out of mind', Kaur admitted that restaurants used to once be her downfall but now she steers clear from bread baskets and chips while dining out.
7. Portion Awareness With Clothing
The trainer also mentioned that she steers clear of comfy joggers as they often led to endless grazing for her, while fitted clothes served as a gentle reminder to respect portions and stay mindful of her body.
8. Throwing Away What Doesn't Serve You
Lastly, Kaur told her viewers that while leftovers tempt her, they do not align with her goals go straight into the bin. For her, it is not about guilt but about choosing herself first.
Apart from this, Kaur also recommends swapping traditional Indian tea with black coffee, white rice with cauliflower rice, packaged juices with electrolytes, fried snacks with baked veggie chips, sugary biscuits with almond flour cookies and white bread with wholegrain bread to maximize benefits.
© 2024 Bennett, Coleman & Company Limited

