- Health Conditions A-Z
- Health & Wellness
- Nutrition
- Fitness
- Health News
- Ayurveda
- Videos
- Medicine A-Z
- Parenting
Is Cross Trainer Bad For Your Knees?

Credits: Canva
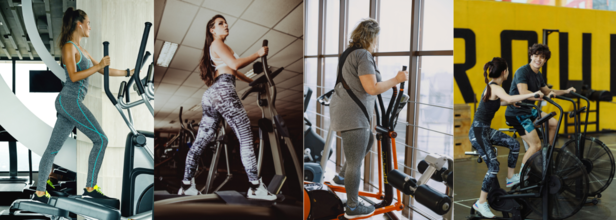
Are you a gym enthusiast? If yes, then chances are that you have spent most of your time on the cross trainer, or the elliptical machine. It is a cardio machine that for the first time gained traction in the 90s and is commonly used even today!
All thanks to its low-impact cardio exercise which can increase heart rate, burn calories and also aid in weight loss without much pain or injury related with running or jogging, that the cross trainer got its fame among people. Despite all this, one concern that looms over is safety, especially for those with weak knees.
Before we delve into how it affects weak knees, let's first figure out how a cross trainer works?
It engages the entire body on a vertical plane by combining the movements of running, stair climbing and skiing. The major difference is that the involved joints do not reach their full range of motion since the feet are planted firmly on the platform instead of being lifted from the ground. This also happens due to artificial movement that changes your natural gait and leads to knee pain because it is inconsistent with body's natural joint motion.
What Could Contribute To Knee Pain?
Improper Alignment: It forces your body to be in a fixed position against proper alignment. This is what leads to strain on your knees, especially if you are not properly positioned while using the elliptical machine.
What could be wrong with your posture? Your hips could be wider than the food pedals. Or, your knees may bow inward and place stress on the joint. Cross trainer also requires you to exercise on the balls of your feet, which engages the quadriceps muscles. This can also pull on the patella or kneecap and cause sharp or shooting pains across the knee.
Intensity: Lack of muscular strength is also a leading cause of knee pain and injury. This is because weak muscles do not absorb enough of the stress exerted on the joint and the knee pain thus continues. Identify if this is happening with you and see if it is because of the low intensity exercise from cross trainer that is not giving you enough challenge to build the necessary muscles to protect your knee.
Many experts have also pointed it that that low intensity machines could further overuse injuries in the knee and hip joints as those who are using do not realize that they are able to do more. This means it can make healthy knee joints weak.
Using Improper Force: Your body is strong and if you use improper force to do a certain exercise it can cause issues. Those with knee pain usually have a load tolerance equal to less than their body weight. So if you tolerance is equivalent to only 50% body weight, then it would mean that you are putting way too much pressure than required, which may keep your joint pain consistent.
Not Having Enough Rest: Whether or not cross training, after any exercise and before any exercise, it is important that you cool down and warm up! Taking rest days are also important as it helps you recover in case there is any muscle injury.
Crossed 40? These 5 Habits Could Slow Down Your Aging, According To Doctor

Credits: iStock
Aging brings a shift in how the body functions. Metabolism slows down, hormones fluctuate, and the risk of conditions such as diabetes, heart disease, joint problems, and bone loss begins to rise. Health experts often describe the 40s as a turning point, a decade where prevention matters more than ever. According to US-based longevity doctor Dr Vassily Eliopoulos, many habits that feel harmless in one’s 20s and 30s begin to show their impact sharply after the age of 40.
In a recent Instagram post, Dr Eliopoulos highlighted five things people should stop doing immediately if they want to protect their long-term health. He wrote that this is the decade to take muscle health seriously, make sleep a priority, and let go of small daily habits that quietly speed up aging. He added that the choices made in the 40s decide how well the body functions in the 50s, 60s, and 70s because preventing damage is always easier than trying to repair it later.
Stop cutting back on sleep
Sleep becomes crucial in the 40s because the body needs more time to repair itself. Dr Eliopoulos explains that adults between 40 and 60 require seven to nine hours of sleep every night to maintain hormone balance, protect cognitive function, and support metabolism. Even losing a single hour can make a difference. Research shows the risk of type 2 diabetes, heart disease, and faster brain aging rises for every hour of sleep below the seven-hour mark. Chronic lack of sleep also encourages fat storage around the abdomen, weakens the immune system, and slows recovery after daily activities.
Simple habits such as keeping the room dark and cool, avoiding late-night screen time, and sticking to a regular sleep schedule can make sleep more restorative. Dr Eliopoulos describes good sleep as a free nightly hormone reset.
Stop neglecting strength training
Muscle loss is one of the most predictable changes after 40. According to Dr Eliopoulos, adults lose three to eight percent of their muscle mass each decade unless they actively work against it. Resistance training two to four times a week can slow this decline dramatically.
Strength work helps maintain bone density, improves insulin sensitivity, and builds lean muscle. Exercises such as squats, push-ups, weightlifting, or using resistance bands increase stability, balance, and overall metabolic rate. Studies also show that middle-aged adults build strength more efficiently with resistance training than relying on cardio alone.
Stop relying on highly processed foods
Packaged snacks, sugary drinks, instant meals, and ultra-processed foods can have a much bigger impact in midlife. More than half of adults over 40 struggle with obesity linked to these foods. They cause sudden spikes in blood sugar and promote inflammation, raising the risk of heart failure. These foods also lack fibre, which affects gut health and increases the risk of colon cancer. Brain health is not spared either, with several studies linking diets high in processed food to faster cognitive decline.
Switching to whole foods such as fruit, nuts, vegetables, and yoghurt can help stabilise energy levels and reduce the risk of diabetes. Reading labels to avoid additives and hidden sugars is an important habit at this stage.
Stop delaying routine health tests
Once a person enters their 40s, regular health screenings become essential. Many conditions, including high cholesterol, prediabetes, thyroid disorders, and vitamin deficiencies, develop silently. Monitoring levels such as A1C, lipid profiles, thyroid markers, and vitamin D helps detect issues early, allowing interventions before symptoms show up. Avoiding tests often means missing warning signs until fatigue, pain, or more serious complications appear.
Stop letting stress build up
Stress hits harder in the 40s because the body becomes more sensitive to cortisol. Continuous stress can raise blood pressure, increase inflammation, affect memory, and contribute to anxiety. Long-term stress even accelerates cellular aging and can push biological age forward by several years. When paired with poor sleep or unhealthy eating, stress significantly increases the risk of stroke.
Dr Eliopoulos recommends daily breathing exercises, regular walks, and simple meditation practices to help reduce stress and protect long-term health.
Disclaimer: Please note that this is a user-generated content. Health and Me does not encourage any changes to be made in your daily schedule without consulting your doctor.
Run To Heal: How A 56-year-old NYC Teacher Ran To Reverse His Diabetes

Credits: iStock, PEOPLE
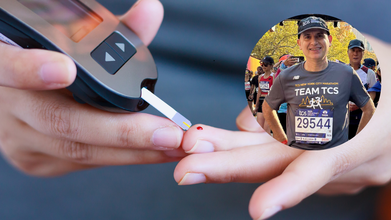
A New York City teacher Pedro Soto, 56, who teachers at the Manhattan school had a simple sore throat and he believed it was from a viral infection, but it soon turned out to be type 2 diabetes.
This was in April 2024, when he went to his doctor with the complaint of a sore throat and took a blood test. This is when he was "officially diagnosed with type 2 diabetes".
In an interview with PEOPLE, he tells while the doctor recommended medications for him, he was determined to make a lifestyle change first. "After receiving the news, I chose not to start medication right away. Instead, I committed to exercising, running twice a week and improving my diet."
Turns out, running, changed his life.
Running With Diabetes: Soto's Determination To Change His Life(style)
Pedro Soto first considered running the TCS NYC Marathon after a colleague mentioned that her husband had completed it. Motivated, he applied through a special program for teachers, sharing an essay about his type 2 diabetes diagnosis. His story earned him a spot on the team. As he trained, he closely monitored his health, undergoing regular blood tests every three months. The improvement surprised him. His blood sugar levels, once concerning, gradually returned to the normal range. While type 2 diabetes cannot be fully cured, it can be reversed, and Soto was seeing that transformation firsthand.
Training Through The Tough Times
The marathon was scheduled for November 2, 2025. Soto’s training, however, didn’t begin smoothly. In June, he learned he had Lyme disease. Around the same time, he lost his father. Because of these back-to-back challenges, he wasn't able to train consistently until August. Running soon became more than exercise. It became a way to navigate grief and rebuild strength.
He describes those months as emotionally heavy. Running offered him space to reflect, heal, and feel close to his father. It became a ritual that allowed him to confront his feelings rather than avoid them.
Experiencing the Race
To prepare mentally, Soto dove into YouTube videos and articles about the marathon. Still, nothing compared to the real thing. To him, race day felt like a citywide block party. The cheering crowds, music, and energy made the pain more bearable. He said that although the long hours of pounding take a toll on joints and muscles, the city's encouragement kept pushing him forward.
Finding Strength in His Students
The toughest stretch came in the final six miles, when self-doubt crept in. What kept him going was thinking about his students. Soto works with teenagers in a transfer program, many of whom have struggled in traditional school systems. Their perseverance inspired him. If his students could show up every day despite their challenges, he believed he could finish the race.
He says he is taking care of his health and this itself is an act of commitment to his students. Whenever he feels healthier, he shows up as a strong educator and for him the marathon teaches him the importance one needs in life of balance, self-care, and knowing when to put themselves first.
How Post Malone Lost 55lbs Just By Cutting Soda And Ditching Junk

Credits: Canva
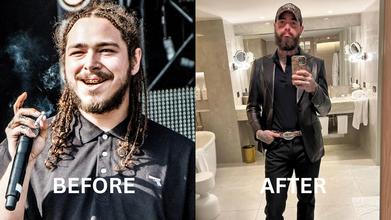
"I'm excited for this next chapter in my life, I'm the happiest I've ever been, and for since I could remember I was sad," said Post Malone as he talked about his journey of losing 55 pounds. He went from 240 lbs to 185 lbs, he revealed at The Joe Rogan Experience Podcast. His inspiration? His daughter. He said that he is focused more on his health since becoming a father.
"It is definitely made me take better care of myself. I want to be around to see her go and do kick-*ss stuff. And before, you know, I was really drinking a lot and smoking a lot and stuff. I kind of took everything and toned it down a little bit and, you know, doing my best and really got my weight going," he said.
His weight loss journey started after he welcomed his daughter in May 2022, and on April 20233, he shared on his Instagram that post becoming a father he is now prioritizing his health.
How Did Post Malone Lose So Much Weight?
He said it is simple, he decided to "kick soda and start eating better". He also is trying to cut down his smokes and brews or give up completely, which is taking time.
On his Instagram post, he wrote: "I've had a lot of people ask me about my weight loss and I'd suppose, performance on stage. I'm having a lot of fun performing, and have never felt healthier. I guess dad life kicked in and I decided to kick soda and start eating better so I can be around for a long time for this little angel. Next up is smokes and brews, but I like to consider myself a patient man... lol!"
While his fans were initially concerned about his weight loss, he reassured them that his "brain is in a super dope place" and he was "the happiest" he has ever been in a long time.
When he made his appearance in June 2024, on The Joe Rogan Experience Podcast, he said that his fans in fact, thought, that he started using drugs, due to his drastic weight loss. This is why he posted on Instagram to deny those allegations. “I remember, whenever I started losing my weight, everybody was like, ‘Hey, this is what meth looks like,’ and I started dancing on stage and having fun and having more energy and just enjoying life again, you know what I mean,” he told host Joe Rogan. “Like I mentioned, I was s***** for a long time, but I had my baby and I’m in a great f****** spot and then the first thing that happens is like, ‘Oh he’s on f****** drugs.’"
However, Malone has confirmed that he is not "any hard drugs".
What Helped Malone Lose 55 Pounds?
In an appearance on The Howard Stern Show in October 2023, Malone said that he has not been on weight loss medication, rather he is now making better food choices.
Earlier, whenever he was on tour, he would go for junk, but now, he has made a deliberate choice to eat "grilled chicken" "carrots" with a "little bit of white rice with hot sauce". He said he was blown away to find out that hot sauce has no calories.
He also shared that he has cut out fried food and pizza. He shared that he would previously eat a lot of junk while on tour, especially because those places were open at 2 am after a show. However, when he made those small dietary changes, he lost 20 pounds, which made him think "let's keep building".
He also shared that he started cutting down on his soda intake. However, he would occasionally reward himself with one after a show.
He also showed off his weight loss in an August 2023 Instagram post on a mirror selfie and wrote: "Introducing Viceroy Chungus VonBattlepass, i love you," in caption.
© 2024 Bennett, Coleman & Company Limited

